
Saturday, February 11, 2012

My new Epiphanie Bag - the Lyric - a review

A few days ago, I got a wonderful happy package in the mail - my brand new Epiphanie Bag! For those of you who don't know, Epiphanie has made a bunch of gorgeous camera bags that also double as a purse. You can read more about them here: http://epiphaniebags.com/ . I was really torn between the Lyric and the Stella bags. I really wanted the Stella bag in gray though, and that won't be back in stock until after I leave for Africa, so I finally decided on the Lyric in plum. I am so in LOVE.
LOVE.
.
.
I couldn't find a lot of reviews out there that showed just what can fit in the Lyric, so I thought I'd share one.
.
My loaded up Lyric. This is the long, adjustable, padded strap. It also comes with a shorter, braided strap.
.
A peak inside it. There are 3 dividers that come with the bag. Two short and one tall. That makes 4 different compartments, plus the zippered pocket at the top. The interior is completely padded, so I don't feel guilty about lugging my DSLR around and worrying about damaging it. The material is very soft and fuzzy too, just as what is in my million dollar crumpler bag.
.
My DSLR coming out of the bag with 100-400 lens attached. The lens was creeping out in this picture. I wanted to make sure that this lens with camera attached would fit in this bag prior to buying it. I think I may need to whip this out on a whim when traveling around Kenya, so this was very important to me.
.
Without the camera. One full compartment at the top and 2 compartments at the bottom of the picture.
.
Starting with the compartment at the top. My Pop-up Flash Bounce found at Photojojo here: http://photojojo.com/store/awesomeness/pop-up-flash-bounce/ . The best $30 I've spent. A lot easier to stomach than buying a flash at this point.
.
Same compartment. My 28-135mm.
.
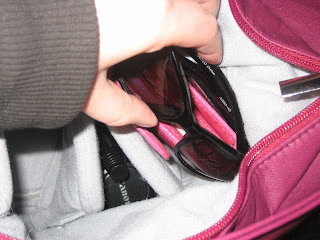
Bottom-most compartment. Non-photography items in this one. My sunglasses.
.
My android phone.
.
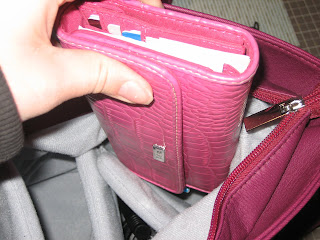
My big wallet.
.
A pill container and some gum.
.
The next smaller compartment. My Lenspen lens cleaner.
.
Same compartment. My 50mm lens.
.
The top zippered compartment. A peak inside. Some girly necessities.
.
My iPod.
.
The front 2 pockets. The one on the right holds my keys.
.
The one on the left. Extra batteries, flash drive, more memory.
.
And my battery charger. Which isn't really all that small.
.
A look at everything that fits!
- Pop up Flash Bounce
- Canon Rebel T1i with Canon 100-400mm f/4.5-5.6 L IS USM and hood attached.
- Camera strap from PhatStraps http://www.phatstraps.com/
- Lenspen
- Canon 50mm f/1.8
- Canon 28-135mm f/3.5-5.6 IS USM
- Flash memory stick and SanDisk MicroMate card reader
- Battery charger & 3 spare batteries
- Sunglasses (from H&M a few years ago)
- T-Mobile MyTouch Android phone
- Keys
- iPod
- Big pink wallet
- Visine, girly items, pill case, compact mirror, gum
.
and I think that's it...
.
That's A LOT of stuff!
.
The bag itself is made of a synthetic leather. I can tell it's not a super expensive material, but my daily purses are coach. It's supposed to be water resistant, and I'm hoping the Lyric will stand up to any abuse I can throw at it. I guess we shall see in less than 2 months when I got to Africa. Hopfully I will report back after my trip!

Tuesday, January 31, 2012

Project Life - Title Page & Week 1

This year, I joined the frenzy and decided to give Project Life a try. I decided to do a loose version of it though and have given myself the option of doing 1 or 2 pages at a time. Project Life was created by Becky Higgens. You can read more about it here: http://www.beckyhiggins.com/products/ . Basically, you devote a 2 page spread (in my case most of the time 1) to each week. You record the little things in a Project Life album, instead of more of the big items, like in my regular scrapbooking. Here is my title page:


I made these cute little silhouettes of our family on (ironically) my Silhouette Cameo.


A close up of my map - where we live!


Love my typewriter :)


Week 1 - Starting with New Year's Eve. Some Chinese Fortunes. Changes at work. Starting Project Life & getting Studio Calico happy mail.


I have decided to try to incorporate a weekly review of some kind into each page. It will include the other bits and pieces of the week that aren't covered yet in journaling or pictures for the week.


Sunday, January 1, 2012

Happy New Year!

Welcome to 2012! I spent last night ushering in the new year at PJ's. Michelle and I went out to supper with her parents (Chris was deciding to be non social), and we stayed hoping to win one of 6 trips to Vegas.


Miranda, Nick, and her sister Heather also showed up at PJ's.


And then she convinced Cindy to stop by too.


Got a lot accomplished this past year:

- Complete rehab from my knee surgery

- Roxy (cat) made a complete recovery from her eyelid surgery

- Five (cat) made a complete recovery from a broken leg

- Removed the boiler from the basement (in pieces)

- Got the house on new supports

- Shingled the house

- Removed the carpet from the pool table room, also removed the ceiling & the closet

- Complete demo of the new laundry room

- Finished the duct work to all the upstairs rooms (yay! we have heat!)

- Rewired the whole upstairs

- Painted the entryway

- Touched up the woodwork in the entryway/stairs (had paint all over the edges)

- Patched & painted the guest bedroom

- Filled in the old air conditioner hole, insulated and sheet rocked the whole wall in the living room

- Insulated the attic (can't wait for our heat bill to drop & our upstairs is already more comfortable)

- Rearranged the stuff in the basement so our stuff could also fit down there

- Got my first layout published in a magazine
- Celebrated 5 years of marriage!

- Applied to be on American Pickers, but didn't quite make the final cut

- Chris started playing farmer boy - baling alfalfa and hay

- Got the corvette done

- Hiked Harney Peak (and made it to the top!)

- Stood by and helped 2 amazing people get married (Jen & Jason)

- Started doing Zumba (and stuck with it for almost half the year, and still going strong)

- Had a successful Christmas at our house (although the flu struck both Chris and Gary)


Things to look forward to/to do in 2012:

- Finish the laundry room project

- Remodel the bathroom

- Finish the pool table room project

- Annual snowmobile trip in February

- Finish the upstairs hallway project

- Continue with my Zumba classes twice weekly and hope to stick with the Bar Method as well
- Participate and complete Photo a Day for all of 2012

- Also start doing Project Life (for scrapbooking) for 2012

- I already have 4 layouts out for publication in 2012!

- Africa! with Amy in April

Sunday, November 20, 2011

Staycation - A Glimpse

I had to burn a week of vacation before the end of the year. So, this past week, I took a staycation. Here's a glimpse of what I did this week (most of these pictures are from my camera phone):

Zumba! My class is on Tuesdays and Thursdays every week. So, naturally I didn't skip them this week. My trusty puma's I got before my last Europe trip.


Up front is our instructor, Larissa. It's so nice for her to be on the stage as we can all see her well to follow along to the routines.


I spent a lot of time working on this door. A lot. And it's nowhere close to being finished. I'm stripping the laundry room door. This is the hallway side and as far as I can tell it had 5-6 layers of paint on it. I've almost got all the paint off this side... almost. I had to improvise a new attachment to my sander so I could get into all those tiny cracks and crevasse's. And let me tell you... GENIUS!! It's working and working very well... WAY better then doing all those tiny details by hand.

I spent a little bit of time in this ground blind. I have been trying to get a close up picture of some deer. Unfortunetly, they have been coming through too late in the day when it is too dark out already. I tell you, the habits of wildlife are going to drive me nuts... probably especially next April when I'm on safari in Kenya!


I did snag this picture of the sunset from my perch though...


I insulated the outer wall of the to-be laundry room...


Saturday we had the first snow of the season. NOT ready for it yet.... at all. I am so a wuss for the cold and blowing right now, I was much enjoying the snowless winter we were having so far.


I did a little late-for-the-season Thanksgiving decorating. We aren't having anyone over for Thanksgiving, so it's just for us now. Can't wait to break out the Xmas decorations next. I need to find a new (or a couple) tablecloth.


Also this week: lots and lots of laundry, organized the basement & finally put some of our totes down there, Chris and I worked on cleaning out the working shop, a Menards run, some scrapbooking, a few new recipies, finished destructing the to-be laundry room, new closet shelving and rods in 2 closets, River City Eatery & the fall high school musical (Singing in the Rain) with Amy, her mom, and her grandma, and chicken foot dominoes afterwards.


All in all, I'd say I had a pretty productive week!

Thursday, November 17, 2011

Studio Calico's Field Guide - October 2011

Here's what I've done so far with Studio Calico's October kit, Field Guide.


That ice cream die cut came from a previous kit, I believe, but I thought it was so perfect for a LO about ice cream. It actually inspired this LO. And I finally got a chance to use my Studio Calico cow stamp. So fun!


I've been trying to document our long summer remodeling... and one of the first things we did this spring was to shingle the house. Dreadful job, but one that had to be done. So, I made sure that it will also be documented in my scrapbooking pages. I used a Heidi Swapp mask for the background and misted in a few different colors.

**Removed for Publishing


I finally did a 2 pager again! I don't often feel like I have enough pictures to warrent a 2 page spread, but I took a ton during our hike up Harney Peak this fall. I Love the pictures from this trip! LOVE! I also added in the pass for our windshield to enter Custer State Park in the bottom right corner. Topped off with some washi tape and it's perfect!


I also love that we were able to get some awesome Fab 4 pics when Anne was back in country for Jen's wedding. I went a little punch crazy on this one... but love the result. And the fact that it's on a gray patterned paper? Even better! I can't seem to get enough of gray these days (i.e. see last LO above).


For this next LO, I broke out my Crafter's Workshop template I got at a going out of business sale last year. I knew when I bought it, it would have some great creative application, but never did I think it would be this spectacular! I love how by just moving the template slightly around the page, I ended up with all this wonderful color and movement. I'm thinking I need to get my hands on a few more of these puppies!


I used a few different kits for this LO, and at the moment I'm not sure of which ones I all used here. I did however, play with my brand new Silhouette Cameo (see that awesome Mt. Rushmore diecut!) {Squeel!} . I sold my Cricut that I never use, and invested in a new Cameo instead. LOVE LOVE this thing! Love that it's based mostly on the computer. but, also Love that I can use an SD card on the go. Love that I don't have to buy whole cartridges for 1 design, and I can instead buy image by image. Still thinking about getting a subscription to the store (you get a discount on prices), but I want to see for sure how much I am actually going to use this before comitting to a whole year. I set up it's very own shelf in my scrap studio and all I have to do is plug my computer into the cameo with a usb cord and I am good to go.


Friday, November 4, 2011

Master Bedroom Project

OK, so I'm finally getting around to posting photos of our Master Bedroom makeover. This project started mid summer last year so we could move in with Grandma and Grandpa G while we fixed up our old place and got it ready for them to move into.

So the first part is what the room looked like before we started the project. Blue. Very very blue... including all the trim in the room. Please notice the matching blue radiatior in the far corner. Also notice the ONLY outlet in this room (well practically the only one upstairs at all) in the far left hand corner of this picture. I will call all the walls by the same consistent name for this whole post. Here you see the window wall and the bed wall. We inherited most of the furniture in the picture, but used most of it in the second spare bedroom. Jake was trying to be very helpful here...


Here is the other side of the room from the corner shown in the pic above. That door is to the hallway, please note there is no closet in this room. I will refer to these walls as the door wall and the closet wall (there will be a closet on that wall eventually, I promise).


And here is a close-up of the radiator. We ripped out the boiler system that was a gagillion years old (seriously, Chris always joked it came over on the Mayflower) and replaced it with a forced air system complete with a heat pump and air conditioning. Best thing ever. (Plus, we didn't have to work around them in the house anymore.) So we had a bunch of radiators to get rid of. I placed them on craigslist and they sold last fall. Also, notice in this picture and the pictures above the oak hardwood floor.


And goodbye blue paint!


And the first coat goes on. I repainted the ceiling (it hadn't been painted in ages, so it sucked up the paint) in Chalk from ACE Hardware. The far wall is the bed wall and the one to the left is the door wall. The yellow is Banana Creme, also from ACE. (It was a little bit yellower that what I was originally planning on, but I like the way the finished project turned out. That blue was a bugger to cover up, as seen through the white trim. I also painted the trim Chalk white (which took a few coats, but that blue did dissapear eventually).


Here is the window wall and the closet wall in progress. The 'dips in the ceiling', as Chris just decided they would be called, were a pain to paint a straight line agross. They are actually where the ceiling vaults through our wall... very typical of a house 121 years old.


And again... my little helper, Jake, thinking he needs to help me paint.


And here is were the finished room pictures start.

We replaced the 121 year old windows with a new custom sized one piece Jeld Wen window. So nice, and they eliminated any drafts.

The window treatments I found from Target a couple years ago. I love how graphic they are.

The curtain rods and tie backs are from Walmart, The Better Homes and Garden collection.

The ceiling fan is from Menards (a favorite place to shop, where the slogan should be 'Spend Big Money at Menards'). It's an LED lighted fan, and let me tell you, do NOT put LED lights on a dimmer. It does not work.

The cedar chest is a hand me down from Gma and Gpa G. (It's still halfway full of thier stuff). Jake loves to sleep on this... instead of 1 of the 2 dog beds in the room.

On the wall to the right of the window is a lovely picture from Stonehenge. I love it!
The empty wall to the left of the window is still looking for that perfect piece of art.


Here is the before picture of the mirror I found on Craigslist. Hidious coloring, but I saw the potential.


In progress: I painted it first with a flat black spray paint, the used a silver paint marker to highlight all the ridges.


And here it is all done on the door wall.

Remember that door? It used to be blue... and it took HOURS, upon hours (like 40 hours) to strip it down to bare wood. The plan is to eventually stain it the color of the doors in the rest of the house. We are waiting until the house it completely jacked up first so the doorway straightens itself back out and the door can be plained to fit properly. Maybe then we can also install an old crystal class doorknob as well...

The dresser is the Hemnes 8-drawer dresser from IKEA in black-brown.
The laundry basket on the right is from Pamida.


And here is a close up of the mirror.


And here is how I solved the closet problem.... A closet system from IKEA! Absolutely LOVE! It's the Pax system in black-brown with Uggdal Gray sliding glass doors. I had to go with the 59" system, as the 78" would fit everywhere except for the afore mentioned 'dips in the ceiling'. Boo... and that is why I have shoes on top of my closet (and for some strange reason Chris' old childhood train set). All this black and gray is why I knew I had to paint the walls a light light color...


My other favorite part of the room? Our bed. I fell in love the moment I saw it. It is the Young Classics Queen Bed with Storage made by Aspenhome from Hom Furniture. It's a platform bed, so we didn't have to use the 'box spring' that came with our Sleep Number bed. And, it has underbed storage with 4 cedar lined drawers.

The nightstands are the Hemnes Chest with 2 drawers from IKEA in black-brown.

The lights are from Target a few years ago.

The bedding I went with is European style. I came back with the idea and the duvet's themselves after my second trip to see Anne in Germany with Amy. It's 2 twin sized duvets, and then you change out the sheets covering them and your pillow and you get a different look for your room everytime. There are no other sheets besides the fitted sheet on the mattress. This duvet set was a wedding gift from Anne and her family, Jutta and Alu. Having the 2 twin sized duvets is such a nice thing, as we never have to fight for blankets, we each can cuddle up in our own. (Going to a hotel now is a completely different story...)


Another view of of the Closet side of the room. Have I said how much I LOVE my closet. Yep, i do!


Here is one of the drawers under our bed opened up. Cedar lined and pretty dang big. Here are 2 of the other sets of duvets I have for our bed. I purposely choose yellow as a paint color for our walls as I view it kind of as a neutral color so I can change up the bedding whenever I feel like it.
Also, please please notice our gorgeous hardwood floors in our bedroom. They were really dull when we first moved in (see one of the first before pictures above), but we had Gino come and refinish it. It's about the only thing we haven't/won't attempt ourselves in our little adventure. We are so happy with the way it turned out, we will have him come and do all our hardwood floors.


Another view of our awesome drawers and floors.


And an open view of my closets. My side of the closet. I love how this is so customizable to whatever you want.... and you may just realize how MANY clothes I actually have here.


And the other side... I must say that I like the actually drawers from IKEA better than the wire baskets. I choose to try both styles out, but definetly more happy with the drawers.


And that is it! If you have any questions, don't hesitate to ask!